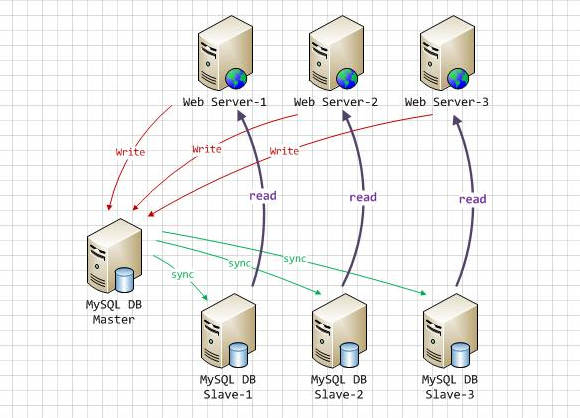
引言 读写分离要做的事情就是对于一条SQL该选择哪个数据库去执行,至于谁来做选择数据库这件事儿,无非两个,要么中间件帮我们做,要么程序自己做。因此,一般来讲,读写分离有两种实现方式。第一种是依靠中间件(比如:MyCat),也就是说应用程序连接到中间件,中间件帮我们做SQL分离;第二种是应用程序自己去做分离。这里我们选择程序自己来做,主要是利用Spring提供的路由数据源,以及AOP
然而,应用程序层面去做读写分离最大的弱点(不足之处)在于无法动态增加数据库节点,因为数据源配置都是写在配置中的,新增数据库意味着新加一个数据源,必然改配置,并重启应用。当然,好处就是相对简单。
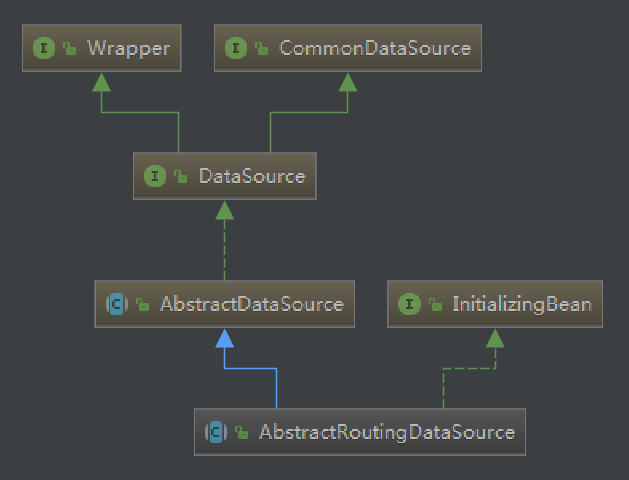
AbstractRoutingDataSource 基于特定的查找key路由到特定的数据源。它内部维护了一组目标数据源,并且做了路由key与目标数据源之间的映射,提供基于key查找数据源的方法。
类对应的注释:
1
2
3
Abstract {@link javax.sql.DataSource} implementation that routes {@link #getConnection()} calls to one of various target DataSources based on a lookup key. The latter is usually (but not necessarily) determined through some thread-bound transaction context.
大概意思就是getConnection()根据查找lookup key键对不同目标数据源的调用,通常是通过(但不一定)某些线程绑定的事物上下文来实现。通过这我们知道可以实现:
多数据源的动态切换,在程序运行时,把数据源数据源动态织入到程序中,灵活的进行数据源切换。
基于多数据源的动态切换,我们可以实现读写分离,这么做缺点也很明显,无法动态的增加数据源。
实践 关于MySQL的主从复制配置,可以参考<<MySQL主从复制配置>>
pom.xml 1 2 3 4 5 6 7 8 9 10 11 12 13 14 15 16 17 18 19 20 21 22 23 24 25 26 27 28 29 30 31 32 33 34 35 36 37 38 39 40 41 42 43 44 45 46 47 48 49 50 51 52 53 54 55 56 57 58 59 60 61 62 63 64 65 66 67 68 69 70 71 72 73 74 75 76 77 78 79 80 81 82 83 84 85 86 87 88 <?xml version="1.0" encoding="UTF-8"?> <project xmlns ="http://maven.apache.org/POM/4.0.0" xmlns:xsi ="http://www.w3.org/2001/XMLSchema-instance" xsi:schemaLocation ="http://maven.apache.org/POM/4.0.0 http://maven.apache.org/xsd/maven-4.0.0.xsd" > <modelVersion > 4.0.0</modelVersion > <parent > <groupId > org.springframework.boot</groupId > <artifactId > spring-boot-starter-parent</artifactId > <version > 2.1.3.RELEASE</version > <relativePath /> </parent > <groupId > com.learn.mysql</groupId > <artifactId > read_write</artifactId > <version > 0.0.1-SNAPSHOT</version > <name > read_write</name > <description > Demo project for Spring Boot</description > <properties > <java.version > 1.8</java.version > <project.build.sourceEncoding > UTF-8</project.build.sourceEncoding > <project.reporting.outputEncoding > UTF-8</project.reporting.outputEncoding > </properties > <dependencies > <dependency > <groupId > org.springframework.boot</groupId > <artifactId > spring-boot-starter-aop</artifactId > </dependency > <dependency > <groupId > org.springframework.boot</groupId > <artifactId > spring-boot-starter-web</artifactId > <exclusions > <exclusion > <artifactId > spring-boot-starter-tomcat</artifactId > <groupId > org.springframework.boot</groupId > </exclusion > </exclusions > </dependency > <dependency > <artifactId > spring-boot-starter-undertow</artifactId > <groupId > org.springframework.boot</groupId > </dependency > <dependency > <groupId > org.mybatis.spring.boot</groupId > <artifactId > mybatis-spring-boot-starter</artifactId > <version > 2.0.0</version > </dependency > <dependency > <groupId > org.apache.commons</groupId > <artifactId > commons-lang3</artifactId > <version > 3.8.1</version > </dependency > <dependency > <groupId > org.springframework.boot</groupId > <artifactId > spring-boot-configuration-processor</artifactId > </dependency > <dependency > <groupId > org.springframework.boot</groupId > <artifactId > spring-boot-devtools</artifactId > <scope > runtime</scope > </dependency > <dependency > <groupId > mysql</groupId > <artifactId > mysql-connector-java</artifactId > <scope > runtime</scope > </dependency > <dependency > <groupId > org.projectlombok</groupId > <artifactId > lombok</artifactId > <optional > true</optional > </dependency > <dependency > <groupId > org.springframework.boot</groupId > <artifactId > spring-boot-starter-test</artifactId > <scope > test</scope > </dependency > </dependencies > <build > <plugins > <plugin > <groupId > org.springframework.boot</groupId > <artifactId > spring-boot-maven-plugin</artifactId > </plugin > </plugins > </build > </project >
数据源配置 application.yml 1 2 3 4 5 6 7 8 9 10 11 12 13 14 15 16 17 18 19 20 21 22 23 spring: datasource: master: type: com.zaxxer.hikari.HikariDataSource username: root password: 1230 url: jdbc:mysql://192.168.43.8:15001/test?serverTimezone=GMT%2B8&useUnicode=true&charactorEncoding=utf-8&useSSL=false driver-class-name: com.mysql.cj.jdbc.Driver slave01: type: com.zaxxer.hikari.HikariDataSource username: readonly password: 110 url: jdbc:mysql://192.168.43.8:15002/test?serverTimezone=GMT%2B8&useUnicode=true&charactorEncoding=utf-8&useSSL=false driver-class-name: com.mysql.cj.jdbc.Driver slave02: type: com.zaxxer.hikari.HikariDataSource username: readonly password: 110 url: jdbc:mysql://192.168.43.8:15003/test?serverTimezone=GMT%2B8&useUnicode=true&charactorEncoding=utf-8&useSSL=false driver-class-name: com.mysql.cj.jdbc.Driver logging: level: com.learn.mysql.read_write.component: info
写到这里突然断电了,IDEA瘫了,删除默认配置文件,重启IDEA,重新创建新项目#_#…
多数据源配置 首先分别将三个数据库配置加载到容器中
1 2 3 4 5 6 7 8 9 10 11 12 13 14 15 16 17 18 19 20 21 22 package com.learn.mysql.read_write.component;import lombok.Data;import org.springframework.boot.context.properties.ConfigurationProperties;import org.springframework.stereotype.Component;import javax.sql.DataSource;@Data @Component @ConfigurationProperties (prefix = "spring.datasource.master" )public class MasterProperties private Class<? extends DataSource> type; private String username; private String password; private String url; private String driverClassName; }
从库的类似,配置好就行
1 2 3 4 5 6 7 8 9 10 11 12 13 14 15 16 17 18 19 20 21 22 23 24 25 26 27 28 29 30 31 32 33 34 35 36 37 38 39 40 41 42 43 44 45 46 47 48 49 50 51 52 53 54 55 56 57 58 59 60 61 62 63 64 65 66 67 68 69 70 71 72 73 74 75 76 77 78 79 package com.learn.mysql.read_write.config;import com.learn.mysql.read_write.component.*;import org.springframework.beans.factory.annotation.Autowired;import org.springframework.boot.jdbc.DataSourceBuilder;import org.springframework.context.annotation.Bean;import org.springframework.context.annotation.Configuration;import javax.sql.DataSource;import java.util.HashMap;import java.util.Map;@Configuration public class DataSourceConfig private final MasterProperties masterProperties; private final Slave01Properties slave01Properties; private final Slave02Properties slave02Properties; @Autowired public DataSourceConfig (MasterProperties masterProperties, Slave01Properties slave01Properties, Slave02Properties slave02Properties) this .masterProperties = masterProperties; this .slave01Properties = slave01Properties; this .slave02Properties = slave02Properties; } @Bean ("master" ) public DataSource masterDataSource () return DataSourceBuilder.create() .type(masterProperties.getType()) .username(masterProperties.getUsername()) .password(masterProperties.getPassword()) .url(masterProperties.getUrl()) .driverClassName(masterProperties.getDriverClassName()) .build(); } @Bean ("slave01" ) public DataSource slave02DataSource () return DataSourceBuilder.create() .type(slave01Properties.getType()) .username(slave01Properties.getUsername()) .password(slave01Properties.getPassword()) .url(slave01Properties.getUrl()) .driverClassName(slave01Properties.getDriverClassName()) .build(); } @Bean ("slave02" ) public DataSource slave01DataSource () return DataSourceBuilder.create() .type(slave02Properties.getType()) .username(slave02Properties.getUsername()) .password(slave02Properties.getPassword()) .url(slave02Properties.getUrl()) .driverClassName(slave02Properties.getDriverClassName()) .build(); } @Bean ("myRoutingDataSource" ) @Autowired public DataSource dataSource (DataSource master, DataSource slave01, DataSource slave02) Map<Object, Object> map = new HashMap<>(); map.put(DBTypeEnum.MYSQL_MASTER, master); map.put(DBTypeEnum.MYSQL_SLAVE01, slave01); map.put(DBTypeEnum.MYSQL_SLAVE02, slave02); MyRoutingDataSource dataSource = new MyRoutingDataSource(); dataSource.setDefaultTargetDataSource(master); dataSource.setTargetDataSources(map); return dataSource; } }
这里,我们配置了4个数据源,1个master,2两个slave,1个路由数据源。前3个数据源都是为了生成第4个数据源,而且后续我们只用这最后一个路由数据源。
MyBatis配置 1 2 3 4 5 6 7 8 9 10 11 12 13 14 15 16 17 18 19 20 21 22 23 24 25 26 27 28 29 30 31 32 33 34 35 36 37 38 39 40 41 package com.learn.mysql.read_write.config;import org.apache.ibatis.session.SqlSessionFactory;import org.mybatis.spring.SqlSessionFactoryBean;import org.springframework.beans.factory.annotation.Autowired;import org.springframework.context.annotation.Bean;import org.springframework.context.annotation.Configuration;import org.springframework.core.io.support.PathMatchingResourcePatternResolver;import org.springframework.jdbc.datasource.DataSourceTransactionManager;import org.springframework.transaction.PlatformTransactionManager;import org.springframework.transaction.annotation.EnableTransactionManagement;import javax.sql.DataSource;@Configuration @EnableTransactionManagement public class MybatisConfig private final DataSource myRoutingDataSource; @Autowired public MybatisConfig (DataSource myRoutingDataSource) this .myRoutingDataSource = myRoutingDataSource; } @Bean public SqlSessionFactory sqlSessionFactory () throws Exception SqlSessionFactoryBean bean = new SqlSessionFactoryBean(); bean.setDataSource(myRoutingDataSource); bean.setMapperLocations(new PathMatchingResourcePatternResolver().getResources("classpath:mybatis/mapper/*.xml" )); return bean.getObject(); } @Bean public PlatformTransactionManager platformTransactionManager () return new DataSourceTransactionManager(myRoutingDataSource); } }
由于Spring容器中现在有4个数据源,所以我们需要为事务管理器和MyBatis手动指定一个明确的数据源。
设置路由key / 查找数据源 目标数据源就是那前3个这个我们是知道的,但是使用的时候是如果查找数据源的呢?
首先,我们定义一个枚举来代表这三个数据源
1 2 3 4 5 6 7 8 9 package com.learn.mysql.read_write.component;public enum DBTypeEnum { MYSQL_MASTER, MYSQL_SLAVE01, MYSQL_SLAVE02; }
接下来,通过ThreadLocal将数据源设置到每个线程上下文中
1 2 3 4 5 6 7 8 9 10 11 12 13 14 15 16 17 18 19 20 21 22 23 24 25 26 27 28 29 30 31 32 33 34 35 36 37 38 39 40 41 42 43 44 45 46 47 48 49 50 51 52 package com.learn.mysql.read_write.component;import lombok.extern.slf4j.Slf4j;import java.util.ArrayList;import java.util.concurrent.atomic.AtomicInteger;@Slf 4jpublic class DBContextHolder private static final ThreadLocal<DBTypeEnum> DB_TYPE_ENUM_THREAD_LOCAL = new ThreadLocal<>(); private static final AtomicInteger ATOMIC_INTEGER = new AtomicInteger(); private static final ArrayList<DBTypeEnum> SLAVES = new ArrayList<>(); private static final int slave_size; static { for (DBTypeEnum dbTypeEnum : DBTypeEnum.values()) { if (dbTypeEnum != DBTypeEnum.MYSQL_MASTER) { SLAVES.add(dbTypeEnum); } } slave_size = SLAVES.size(); } private static void set (DBTypeEnum dbTypeEnum) DB_TYPE_ENUM_THREAD_LOCAL.set(dbTypeEnum); } public static DBTypeEnum get () return DB_TYPE_ENUM_THREAD_LOCAL.get(); } public static void master () set(DBTypeEnum.MYSQL_MASTER); log.info("切换到:{}" , DBTypeEnum.MYSQL_MASTER); } public static void slave () if (ATOMIC_INTEGER.getAndIncrement() >= slave_size) { ATOMIC_INTEGER.set(0 ); } DBTypeEnum target = SLAVES.get(ATOMIC_INTEGER.get()); set(target); log.info("切换到:{}" , target); } }
获取路由key
1 2 3 4 5 6 7 8 9 10 11 12 13 14 15 16 package com.learn.mysql.read_write.component;import org.springframework.jdbc.datasource.lookup.AbstractRoutingDataSource;import org.springframework.lang.Nullable;public class MyRoutingDataSource extends AbstractRoutingDataSource @Nullable @Override protected Object determineCurrentLookupKey () return DBContextHolder.get(); } }
设置路由key
默认情况下,所有的查询都走从库,插入/修改/删除走主库。我们通过方法名来区分操作类型(CRUD)
1 2 3 4 5 6 7 8 9 10 11 12 13 14 15 16 17 18 19 20 21 22 23 24 25 26 27 28 29 30 31 32 33 34 35 36 37 38 39 40 41 42 43 44 45 46 47 48 49 package com.learn.mysql.read_write.aop;import com.learn.mysql.read_write.component.DBContextHolder;import org.aspectj.lang.annotation.Aspect;import org.aspectj.lang.annotation.Before;import org.aspectj.lang.annotation.Pointcut;@Aspect public class DataSourceAop @Pointcut ("!@annotation(com.learn.mysql.read_write.annotation.Master) " + "&& (execution(* com.learn.mysql.read_write.service..*.query*(..)) " + "|| execution(* com.learn.mysql.read_write.service..*.list()))" ) public void readPointcut () } @Pointcut ("@annotation(com.learn.mysql.read_write.annotation.Master)" + "||(execution(* com.learn.mysql.read_write.service..*.add(..)))" + "||(execution(* com.learn.mysql.read_write.service..*.delete(..)))" + "||(execution(* com.learn.mysql.read_write.service..*.update(..)))" ) public void writePointcut () } @Before ("readPointcut()" ) public void read () DBContextHolder.slave(); } @Before ("writePointcut()" ) public void write () DBContextHolder.master(); } }
有一般情况就有特殊情况,特殊情况是某些情况下我们需要强制读主库,针对这种情况,我们定义一个主键,用该注解标注的就读主库
1 2 3 4 5 6 7 8 package com.learn.mysql.read_write.annotation;public @interface Master {}
有一张表t_user,对应的实体类只有3个属性:
1 2 3 4 5 6 7 8 9 10 11 12 13 14 15 16 17 18 19 package com.learn.mysql.read_write.entities;import lombok.Data;import lombok.experimental.Accessors;import java.io.Serializable;import java.time.LocalDateTime;@Data @Accessors (chain = true )public class User implements Serializable private Integer id; private String name; private LocalDateTime time; }
Mapper:
1 2 3 4 5 6 7 8 9 10 11 12 13 14 15 16 17 18 19 20 21 package com.learn.mysql.read_write.mapper;import com.learn.mysql.read_write.entities.User;import java.util.List;public interface UserMapper boolean add (User user) boolean delete (int id) boolean update (User user) User query (int id) ; List<User> list () ; }
Service:
1 2 3 4 5 6 7 8 9 10 11 12 13 14 15 16 17 18 19 20 21 22 23 24 25 26 27 28 29 30 31 32 33 34 35 36 37 38 39 40 41 42 43 44 45 46 47 48 49 50 51 52 53 54 55 56 57 58 59 60 61 package com.learn.mysql.read_write.service.impl;import com.learn.mysql.read_write.annotation.Master;import com.learn.mysql.read_write.entities.User;import com.learn.mysql.read_write.mapper.UserMapper;import com.learn.mysql.read_write.service.UserService;import org.springframework.beans.factory.annotation.Autowired;import org.springframework.stereotype.Service;import org.springframework.transaction.annotation.Propagation;import org.springframework.transaction.annotation.Transactional;import java.util.List;@Transactional (timeout = 30 )@Service ("userService" )public class UserServiceImpl implements UserService private final UserMapper userMapper; @Autowired public UserServiceImpl (UserMapper userMapper) this .userMapper = userMapper; } @Override public boolean add (User user) return userMapper.add(user); } @Override @Master public boolean delete (int id) return userMapper.delete(id); } @Override public boolean update (User user) return userMapper.update(user); } @Override @Transactional (propagation = Propagation.NOT_SUPPORTED) public User query (int id) return userMapper.query(id); } @Override @Transactional (propagation = Propagation.NOT_SUPPORTED) public List<User> list () return userMapper.list(); } @Master @Transactional (propagation = Propagation.NOT_SUPPORTED) public String getAppId () return "这是appId方法" ; } }
测试 1 2 3 4 5 6 7 8 9 10 11 12 13 14 15 16 17 18 19 20 21 22 23 24 25 26 27 28 29 30 31 32 33 34 35 36 37 38 39 40 41 42 43 44 45 46 47 48 49 50 51 52 53 54 55 56 57 58 59 60 61 62 63 64 65 66 67 68 69 package com.learn.mysql.read_write;import com.learn.mysql.read_write.component.MasterProperties;import com.learn.mysql.read_write.entities.User;import com.learn.mysql.read_write.service.UserService;import com.learn.mysql.read_write.service.impl.UserServiceImpl;import org.junit.Test;import org.junit.runner.RunWith;import org.springframework.beans.factory.annotation.Autowired;import org.springframework.boot.test.context.SpringBootTest;import org.springframework.test.context.junit4.SpringRunner;import java.time.LocalDateTime;@RunWith (SpringRunner.class)@SpringBootTest public class ReadWriteApplicationTests @Autowired private UserService userService; @Autowired private MasterProperties masterProperties; @Test public void testAuto () System.out.println(masterProperties.toString()); } @Test public void testAdd () System.out.println(userService.add(new User() .setName("aaa" ) .setTime(LocalDateTime.now()))); } @Test public void testDelete () int id = 1 ; System.out.println(userService.delete(id)); } @Test public void testUpdate () int id = 2 ; User query = userService.query(id); String name = "newName" ; query.setName(name); query.setTime(LocalDateTime.now()); System.out.println(userService.update(query)); } @Test public void testSelect () int id = 2 ; System.out.println(userService.query(id)); } @Test public void testList () System.out.println(userService.list()); } @Test public void testMaster () if (userService instanceof UserServiceImpl) { System.out.println(((UserServiceImpl) userService).getAppId()); } } }
控制台
testAdd():
1 2 3 4 5 2019-03-29 11:59:01.003 INFO 7584 --- [ main] com.zaxxer.hikari.HikariDataSource : HikariPool-1 - Starting... 2019-03-29 11:59:01.237 INFO 7584 --- [ main] com.zaxxer.hikari.HikariDataSource : HikariPool-1 - Start completed. 执行DataSourceAop...write... 切换到MYSQL_MASTER true
testList():
1 2 3 4 5 6 7 8 9 10 执行DataSourceAop...read... 切换到MYSQL_SLAVE02 执行DataSourceAop...read... 切换到MYSQL_SLAVE01 执行DataSourceAop...read... 切换到MYSQL_SLAVE02 执行DataSourceAop...read... 切换到MYSQL_SLAVE01 执行DataSourceAop...read... 切换到MYSQL_SLAVE02
testDelete():
1 2 3 执行DataSourceAop...write... 切换到MYSQL_MASTER false
testUpdate():
1 2 3 4 5 执行DataSourceAop...read... 切换到MYSQL_SLAVE01 执行DataSourceAop...write... 切换到MYSQL_MASTER true

